7 Important HDB Painting Tips
June 2, 2019
6 Worst Mistakes People Make In Painting Their Homes
June 2, 20196 Ways To Paint Your Office Like A Professional Painter

Are you tired of that dull colour on your office walls or do you just feel the need to upgrade the image of your business. With a single coat of paint, you can transform that boring and unattractive office in to calming and appealing space where you can receive your clients and conduct other businesses. If you want to do the office paint job yourself, below are some 6 ways to paint your office like a professional painter that you can use as a guide.
1. Clear the office decor and have all your office equipment covered
All decor items and equipment should be either removed or covered. If possible, they should be moved to a central location as far away from the walls as possible. This ensures that you are left with enough working area and also protects your decor and equipment from accidental splashes and spills. The office floor should also be adequately covered either with plastic paper or canvas. If you have the two, canvas works better since it is absorbs every paint drop and does not pose a striping hazard like the plastic covers.
2. Prepare the surface to be painted
How well the surfaces to be painted are prepared to a large extent determines the outcome once the paint job is done. To adequately prepare your office walls, sand, scrap, and fill all the cracks and holes. In short take care of all visible imperfections that will show even after a fresh coat of paint is applied no matter the quality of paint used. You also need to tape all edges such a trims door frames and window frames in preparation for painting.
3. Prime the walls
Priming the walls and the ceiling is important if you want the end results to be perfect. Primer works to improve paint adhesion and prevent the walls and the ceiling from bleeding and also allow one coat paint coverage. To ensure a smooth finish, you can tint the primer with a small amount of your chosen paint for the top coat. This allows the top coat to blend with the primer completely hiding the primer surface.
4. Painting the trim
You should start painting your walls from the trim and any the other area that requires a paint brush. Go over the trim and ensure that the paint job is done right. For a prefect finish, the right tools for the job should be used. In the case of the trim, a quality brush should be used. The brush bristles and texture should be consistent with the trim surface being painted. An angled brush may be necessary for painting around the edges.
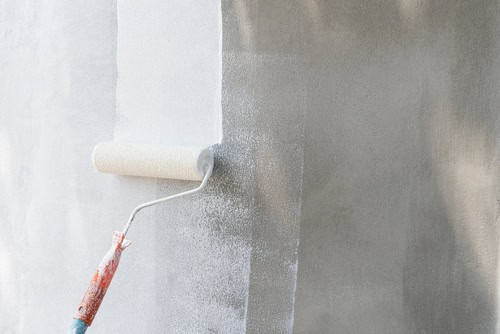
5. Painting the walls and ceiling
The other places to paint after the trim is done are the walls and the ceiling. Start with the ceiling and use a roller to evenly spread the paint throughout the ceiling. For the ceiling, use a roller attached to an extendable pole. This not only makes your work much easier but also ensures a seamless finish.
For the walls make use of the W technique. This basically involves rolling about a three foot W shape on the wall and filling in the shape without lifting the roller. Work from one end of the wall to the other and finish up with each wall before you move over to the next one. This works to save your paint and prevent wastage and also allows you to work on the next walls at another time if you do not have time to finish painting all your office walls at once.
6. Put the finishing touches
After all the surfaces are painted you should go over all the surfaces and ensure that were all covered adequately with the new paint. Some of the areas that may have been forgotten include the window frames and the mouldings on the door. After you have ensured that all the surfaces look perfect, clean your brushes in warm water and cover them using a paper towel to preserve their shape.
From the above points, it is clear that painting your office is a task that you can accomplish. The task however requires a certain level of effort and some patience for a perfect job. You can always choose to involve a professional to paint your office if you find the job too tasking or do not have the time to do it yourself.